|
|
Post by Dun Dign on Mar 23, 2006 20:39:48 GMT -6
Try tacking the boards on the shed wall. You are working at bench height, and eye level. Less bending!! Used to leen on the wall ,and down on the knees.
|
|
|
|
Post by fishadict on Mar 23, 2006 20:52:24 GMT -6
Well, Beav taught me, so it's plywood and nails. I like them tight. ;D A few nail holes will split on the sides as the hide dries, but that is going to get trimmed off later anyway, so I don't worry about it.
I have watched Greg Schroeder do them with staples and it is quick. He uses a pliers in his left hand and a staple gun in his right hand. Impressive to watch.
fa
|
|
|
|
Post by TurTLe on Mar 23, 2006 22:22:58 GMT -6
I used nails up until two years ago. Switched to staples and won't ever change back. Staples are way faster in my oppinion.
|
|
|
|
Post by MRussell on Mar 23, 2006 23:17:39 GMT -6
Ok turtle, what is your method when using the staples. How long are your staples?
MR
|
|
|
|
Post by Missourian on Mar 24, 2006 14:51:00 GMT -6
Thanks for the info. I've got a pattern from NAFA on its way.
This may be a stupid question, but do you leave the head on the pelt, or is it trimmed off before stretching? I've always just sold them green, but would like to start putting them all up next year. Thanks, Adam
|
|
|
|
Post by love2trap on Mar 24, 2006 16:51:53 GMT -6
Adam, you skin the head out just like any other furbearer. Cut the ears close, small eye holes and skin the nose out. I try to clean skin from the ears up so I don't have to mess with fleshing the head. My first nail goes right through the nose on the board.
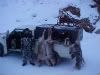
Take a look at Jeff's picture on the previous page. The beav in the middle has it's head on the bottom towards the floor. You will make out the ears, eyes, and nose.
One other tip that I tried out this year and really like is to only open the beaver up to the brisket area on my opening cut. Skin the lower half open and the upper half (shoulder/head area) cased. I found that it helps keep the beav from sliding around while fleshing, plus when you're done fleshing and finish the cut up to the chin, there's no lingering fat on the edges. My buddy Brian turned me on to this idea and for the way I put up fur...it's a keeper!
Mark
|
|
|
|
Post by musher on Mar 24, 2006 20:33:35 GMT -6
I don't believe in stretching them tight. Stretching them " baggy" makes the fur look denser. They'll dry tight and the "bag" is always gone. I believe baggy earns you more money.
Aren't 69 inches on up thrown in the same pile?
Isn't there some cord or ribbon system that's slipped under the staples to speed their removal?
The nice thing about a semi-cased skinned beaver is that they hold onto the fleshing beam much better.
If you can semi-freeze the hides before fleshing, rough skinning is quick. If you can't, learn to clean skin.
|
|
|
|
Post by TurTLe on Mar 24, 2006 22:20:36 GMT -6
MRussell
My method is just like what Dale Billingsley does in his beaver video. I grab the beaver by the head and bottom, and pull as tight as I can over the board, then back off equivalant to 3 spaces. I put about three staples at the top, then the bottom, then the two sides.
Then I get my needle nose pliers and start pulling and stapling.
I use an electric stapler with either T50 1/2's or 9/16's. Just make sure the stapler is set on a lower setting. It sucks trying to get 9/16's out when you drive them in flush.LOL
|
|
|
|
Post by robertw on Mar 24, 2006 23:49:12 GMT -6
Turtle,
How much trouble do you have with staple removal from the pelt?
I tried the staple's on about a hundred head of coons a couple of years ago and by the time I got those staples out.....I swore never to do it again! They sure go in fast though!
Guess I just like my "dry wall" nails and smashing my thumb with the hammer every couple of beavers!
|
|
|
|
Post by wannacatchmink on Mar 25, 2006 0:12:18 GMT -6
I;ve been useing wood and hoops. Jeff, do you got any pictures of the leg holes, it looks like they are folded over in yours too but i cant tell. Here is a couple pictures of beaver on hoops and wood. They both take about the same time frame for me but i like hoops cuz you can hang them up, i like wood cuz i can get them into a better shape easier. I got a couple beaver one was on wood, one on wire, same size and you cant tell which was on which. Here is the wood, this is the first time ive gotten to use lines on boards, finally caught enough beavers to get me some plywood and use my pattern. So dont laugh, first season putting up beavers and not to experienced with wood lol. 55 lb beaver  a smaller beaver 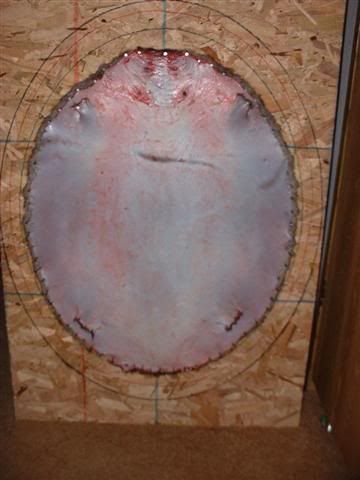 And here is the 1st 2 beavers i ever put up. 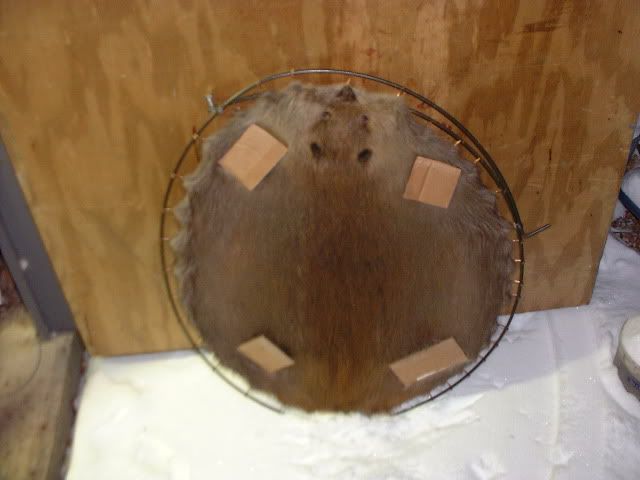  Now i know that i had to big of gaps, and thats sinced changed, i think i use way to many more rings than needed now but the saw tooth look is gone lol. Ohh ya, one question, doesnt farm supply stores sell hog rings? Is there different sizes? if so, what size do i need? I've always ordered mine. |
|
|
|
Post by jeffc on Mar 25, 2006 6:50:23 GMT -6
I got rid of all my beavers yesterday so can't take any more pics but I had the legs closed just like you did on the wood. There was one beaver that I stretched then he was too tight to close the front legholes, he had a bad snare mark and a place where i nicked him skinning him so I just left those open but closed all the others up.
Your beavers Look nice it feels pretty good to finish them dont it.
Jeff
|
|
|
|
Post by Dun Dign on Mar 25, 2006 8:00:00 GMT -6
Wanacatchmink, The pics you display on wood ,starting at the top of the nose, that pattern line you are on is were you want to continue the rest of the pelt. As mentioned on earlier post. you should feel appox. 1/2 '' "Sag" when you push in with your finger at center of pelt. It will tighten up when dry. Also when dealing with the leg holes, cut them "Flush" and toe in four nails.When all nailed up take a flat, wide screwdriver ,and go around the entire pelt, and pull the pelt up in the direction of the nail head approx. 3/4 inch, this will allow air to circulate for drying. Looks like your doing a good job other than that.  |
|
|
|
Post by MRussell on Mar 25, 2006 9:01:10 GMT -6
Thanks TurTLE, I used some staples the other day cause I was out of nails and had to do something, So I got out the roofing stapler we used on the felt paper and away I went. I plan on getting an electric stapler.As far as nails are concerned I have had better (friendlier) times using 2" finish nails. They go in real easy and come out the same way.
MR
|
|
|
|
Post by Muskratman1 on Mar 25, 2006 13:47:29 GMT -6
Longer nails reduce the number of black thumb nails. Instead of finish nails, use an 8 penny that has a bigger head. They don't get stuck in the hammer like finish nails when jack hammering them out. In other words, you don't have to get the nail head all the way down in the claw to pull. Here's a pic of a closed leg hole on wood. 1 to 2 nails in the front feet and 3 to 4 on the back feet depending on the size of the critter. Put a nail in your opposite hand to fold the fur under the skin while pulling on the nail you're going to nail.  MM1 |
|
|
|
Post by Dun Dign on Mar 25, 2006 15:06:54 GMT -6
Thats how they should look!! Nice job!
|
|
|
|
Post by thorsmightyhammer on Mar 25, 2006 19:25:40 GMT -6
Some might disagree with what I'm about to say but.
Stretch your beaver as tight as you can even if you have to use a vise grips to get it to the farthest point, you can't over stretch them.
I am gonna set out some bait. For whatever my opinion is worth I will all but gurantee that stretching the he@@ out them is the best.
Anyone want to debate this?
will be the odd man out again, I have always used hoops and hog rings. I know that you can stretch a little better on wood, but when you are into the chisel tooths heavy, I wasn't thinking about that extra 1/2 " of size, I was looking to get to the bottom of the pile of Beaver on the floor. Hoops are faster in my opinion
For what its worth DJ this year at NAFA a 64 and a half inch beaver was worth 20 bucks less than a 65 inch beaver. In todays market boys size is the name of the game.
Before you get on me about doing a pile of beaver... I managed to catch a 165 by myself in about five weeks this winter, my old man caught about 200 in those same five weeks. We trap by ourselves but put them up together. Got them done on boards. Plus rats, mink, coyotes and the kicker. About 400 more spring ones out of the freezer. Took me about two weeks past trapping to finish up the last hundred. Got to fish some time.
I am going to go on a limb.
I dont like the NAFA stencil. I think it is wrong and i only use it as a guide.
I believe is should be longer on the ends and narrower on the sides. I firmly believe it is too wide in the shoulders. I use it strictly as a "guide" but pretty much stretch them how I want.
MM1 can you make me one of your stencils in the FHA pattern? Havent tried it yet because I am too lazy to change out my boards but with a fast system I may.
If anybody wants to debate it will have to wait until tomorrow.
Spent three days in the cities one day in Soughton and today on lake of the woods. I am going to spend some time with the wife.
|
|
|
|
Post by dj88ryr on Mar 25, 2006 19:35:52 GMT -6
I am not going to argue with you steven49er, everyone works with what they feel is best. Like I said, with a pile of Beaver on the floor, I wasn't worrying about that extra 1/2 " of course average prices were over $50 already. If I were to use your methods, I would not have gotten out of the shed in time to go check traps, there were mornings that the sun would be breaking the horizon, when we finished. Those were the years my nephew and I went over 400 for the season. No two ways about it, it is ball breaking work, but I will stick to my hoops.
|
|
|
|
Post by robertw on Mar 25, 2006 21:58:08 GMT -6
The NAFA pattern has worked well for me on midwestern and western beavers, however...The southern beavers tend to run leaner through the hips and butt. Using the NAFA pattern on the southern's I end up one line longer one each end than on the sides.
|
|
|
|
Post by wannacatchmink on Mar 26, 2006 0:53:01 GMT -6
Thanks guys!! I'll remember that on my next ones!!
I did follow the lines, its the angle of the pic that shows it different, i just checked the nails and they are all on the same one.
Anyone here ever use the rubber band method of closeing the leg holes, I thought about that.
BTW, those are FHA patterns there. All I had so i just used them.
Is there an easy way to pick which ring you need to use, thats what i was having a hard time decideing, which line to follow.
thanks,
Ryan
|
|
|
|
Post by Muskratman1 on Mar 26, 2006 5:15:08 GMT -6
"MM1 can you make me one of your stencils in the FHA pattern? Havent tried it yet because I am too lazy to change out my boards but with a fast system I may.
"
Steven - I'll look into it.
MM1
|
|